1. Use Block Sender frequently
Use Outlook’s Block Sender feature to add intrusive spam to your Block Sender List, and then move it to the Junk Email folder. This works fine if you receive fewer than a dozen emails a day.
Select the spam email, right-click, choose
Junk from the drop menu, and click
Block Sender. Or, Select
Home >
Junk >
Block Sender. Outlook marks it and relocates it immediately.
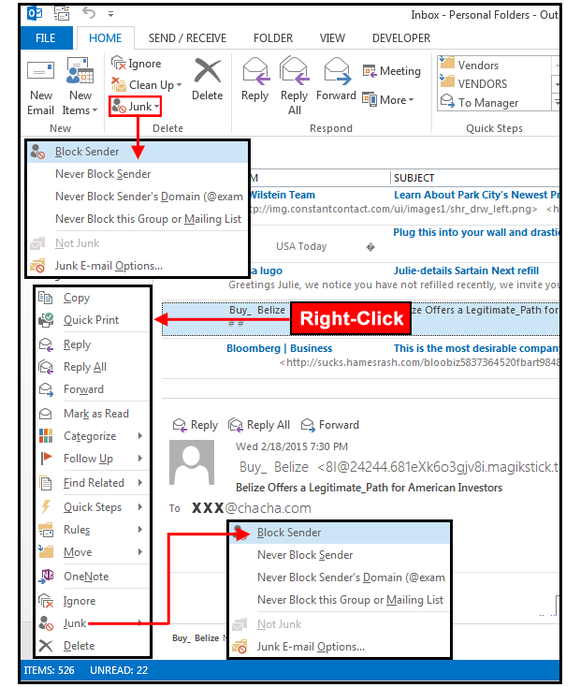
Use Block Sender frequently to automatically add the senders to Junk Email folder.
2. Set up a Blocked Sender list
If you get a lot of spam from a single ISP or country, or from a phishing group impersonating a legitimate organization, such as Yahoo6.com, epaypal.com, or an email from Wellsfargo with an EarthLink address (hbird80@earthlink.net), you can add these bad actors to your Block Sender list by company, group, country, ISP, or other criteria. Select
Home >
Junk >
Junk Email Options and click the
Blocked Senders tab. Click the
Add button and enter a country code, a group domain, or a even a fake company (epaypal.com).
As the examples listed in this dialog box show, you don’t need wildcards to block all email from a group or company. Just enter the group name preceded by the @ sign, or the name alone. Click
OK >
Apply >
OK. Task complete.
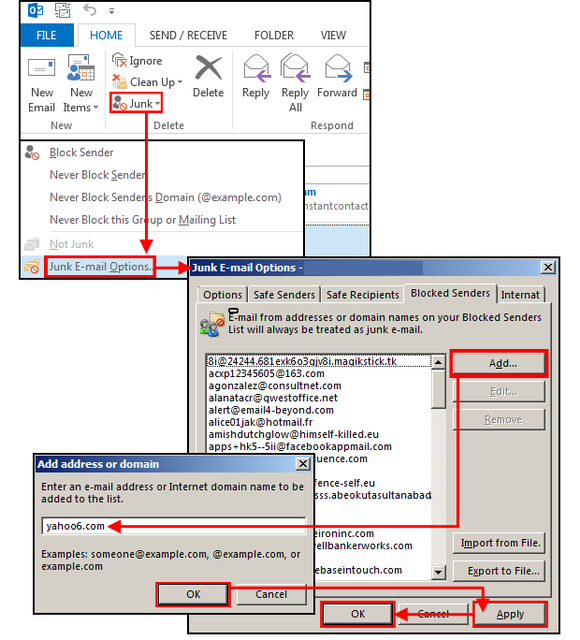
Use the Block Sender list to block groups, countries, and fake companies.
If you try these techniques, and you’re still getting spam from some of the companies or individuals you preciously blocked, then using wildcards may be the solution. This technique addresses the challenge that hackers are always inventing new email addresses for spamming you. Instead of entering individual spam email addresses into your Blocked Sender List, just enter this one “all-inclusive” email address: *@*.com into the Blocked Sender’s List. Follow the instructions in the first three paragraphs of section 2 above, and your spam problem should be solved—or will be, that is, until the hackers write another program to get around this solution.
3. Create Rules for sorting, moving and more
Outlook has a feature called “Create Rule” that offers custom email management based on conditions that you define in its virtual rulebook. Like macros, these rules automate repetitive tasks that you perform daily, such as telling Outlook which emails to display in specific windows, move emails to other folders, and/or create alerts with custom sounds.
Select the email you want moved to another folder. Select
Home >
Rules >
Create Rule. In the dialog box, Outlook asks:
When I get email with the selected conditions (From, Subject, Sent To)
do the following: Display in New Item Alert Window, Play Selected Sound, or Move Item to Folder. Outlook assumes you want to check all three of the top boxes, but feel free to uncheck those that do not apply. In the bottom pane, check the boxes that perform the actions you require, then click
OK.
In the following example (see graphic below): In Sample 1, this rule says flag all emails From: Comcast, with the Subject: “Your bill is ready,”
Sent To: xxx@chacha.com, then do the following: Play Sound: Windows RingIn.wav, and then Move to Folder: Bills Due. For Play Sound, click
Browse, navigate to the Windows/Media folder, then choose a sound from the list. For Move to Folder, click the
Select Folder button, and choose one from your hard drive’s folder list.
In Sample 2, all spam emails with Subject: Jace and Sent To: xxx@chacha.com are flagged and sent to the Junk Email folder. The subject line here has too many words for a good match, so this field box was unchecked.
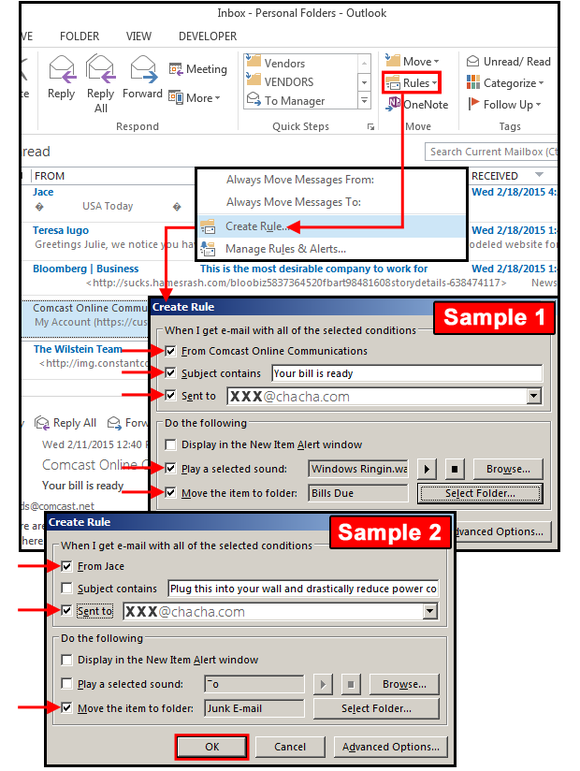
Use Create Rule for custom email management based on conditions that you define.
4. Rules Wizard (advanced options)
You can create rules that block spam—or set up a number of other handy tasks—based on specific criteria that you set.
For this example: UserKC receives a lot of spam emails with attachments in her Inbox that are not addressed to her email address. In this case, the email was sent to somebody named mikeal.victor98@gmail.com, but she received it instead. This is a common phishing scam that’s escalated over time, so she decided to create a rule to automate a process that kills these spam attacks.
Select
Home >
Rules >
Create Rule. In the
Create Rule dialog box, click the
Advanced Options button.
In the
Rules Wizard dialog box, Outlook asks: “Which condition(s) do you want to check? Step1: Select Condition(s).” Scroll through the list and choose the conditions that apply to your unique situation. In this example, UserKC selected w
here my name is not in the To box and w
hich has an attachment. Outlook enters the conditions in the Step2 box. Click
Next.
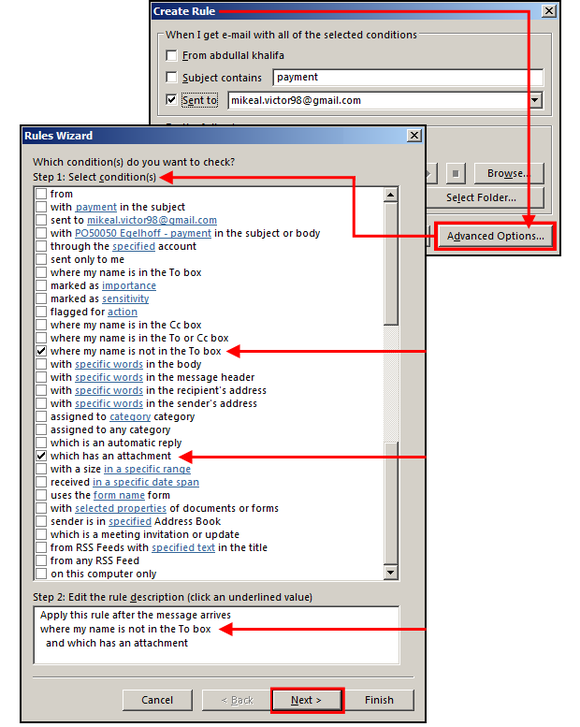
Create rules that block spam, in addition to a number of other handy tasks, based on specific criteria that you set.
In the second Rules Wizard dialog, Outlook asks: What do you want to do with the message? Step1: Select Action(s). UserKC checked
move it to the specified folder.
Notice the underlined text here and in the Step 2 box: That means, “click this link to complete this action.” Click once, choose the “specified” folder (Junk Email), then click
OK. Outlook adds this action to your rule, then re-displays the additional rule in a new Step2 box. Click
Next.
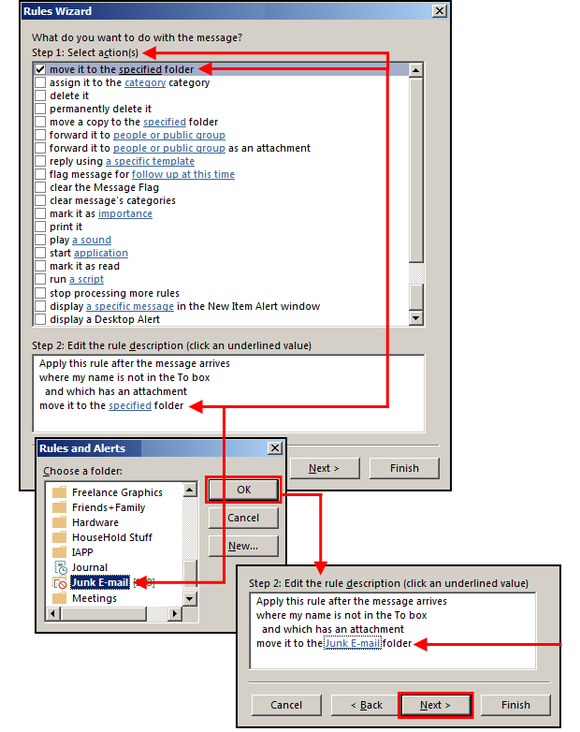
Underlined text means click this link to complete this action.
In the third Rules Wizard dialog, Outlook asks: Are there any exceptions? Step 1: Select Exceptions. UserKC decided to add a safety exception: If the sender name/email address matches a record in my current address book, then do nothing. Check the exception box, click the underlined “specified” Address Book, select the applicable contact list, then click
Add.
Notice the new Step 2 box contains all the rules you just created. If acceptable, click
Finish. The Finish Rules Setup Wizard dialog opens and requests that you specify a name for this rule (or collection of rules, actually). Enter a descriptive name, check the “Turn On this Rule” box, and click
OK. Now, all those misdirected phishing and spam emails will go directly to your junk file folder.
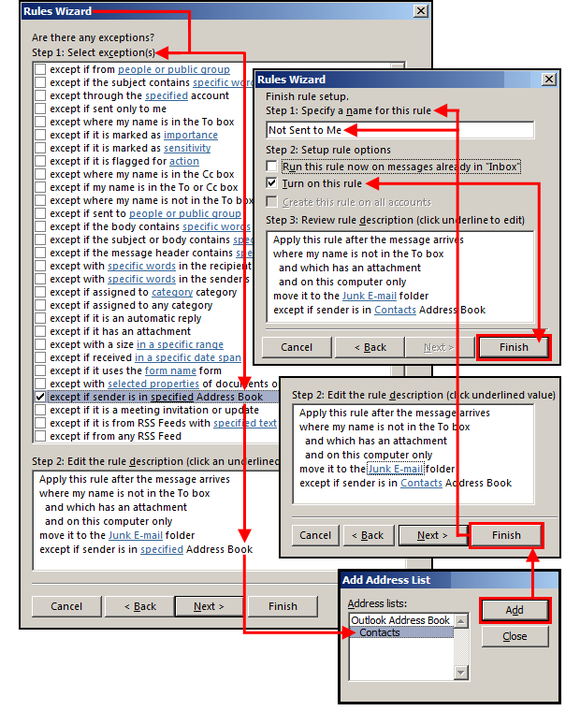
Enter exceptions and name the rule.
5. Check spam folders often
Spam, phishing and blocking filters, and the rules that govern them, come in multiple levels. In addition to the filters and rules you create on your own computer, your email software, antivirus program, Internet provider, network administrator, individual supervisor, and possibly others all have various systems for protecting users from harmful and/or unsolicited communications. The often aggressive techniques these systems use to filter out the garbage means some legitimate emails may not get through.
Check your spam folders often at every level, especially if you’re expecting a communication that never shows up. It’s generally easy to access your spam folders at the ISP level, because most providers offer an email program with the service, which includes a spam folder. Individual company policies may not be as flexible or convenient. Talk to your network administrator if you’re missing emails to determine whether the contents of the spam folders are accessible and available to review. If not, ask your friends, colleagues, and associates to monitor their communications and call you if you don’t respond in a timely manner. Or, if your company policies allow it, consider providing a second, backup email address to catch those drifters that wander into corporate traps.


